Your cart is currently empty!
Lookin’ Sharper
While there are many techniques for sharpening, some yield better results than others. We have selected one with a counterintuitive name…Unsharp Masking. Why? Because it tends to accentuate the important parts to the image without increasing visual noise or graininess.
Unsharp Masking actually began as a clever technique to enhance the sharpness of printed images in the chemical/analog world. Digital Unsharp Masking is uses a similar technique, and works something like this:
– It’s good to determine what should be sharpened, so edges are detected. This is in effect “applying a mask” so that only those parts of the image that are significant enough to enhance are subject to sharpening. In other words, those areas that may have small differences from pixels to pixels, like water in the background, are not subject to sharpening, while the intricacies the fish scales are sharpened.
– A threshold is applied. If the change from one part of the image to another at an edge is small, the edge is not sharpened. If the threshold is set high, only major transitions are sharpened. In particular, if you are seeing graininess and pixellation, set the threshold higher.
– The area at an edge subject to sharpening is determined. If you want the sharpening to be very noticeable, this number, called the radius, is set high and the changes to the image will cover more space at an edge. If a subtle touch is required, particularly when there is fine detail, set the number lower.
– The amount of sharpening that is applied, or sigma, is selected. This is the volume control, the gas pedal, the dimmer switch. More is not always better, since the image can go beyond nicely sharp to fake-looking.
Using these sharpening controls can be a little tricky, so we have selected settings that work well for most images. But you have access to them as well if you’d like to tailor the effects to your images. Just remember that this is one case where too little tends to be better than too much.
Also note that sharpening is resolution dependent. If you crop to a small image size, the sharpening will have more effect than if it was applied to the full image.
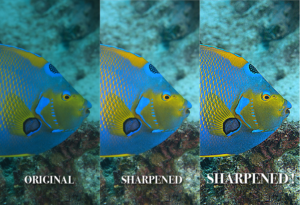
The example image shows the uncorrected original image, a nicely sharpened and corrected image, and one that is probably over-sharpened. Note the graininess and outline of the fish. It almost looks as if it has been pasted on the background. The rule of thumb is that if you notice the subject has been sharpened, you’ve gone too far. But what is nicely sharp or over-sharpened is a personal preference, so sharpen your images so you like them.