Your cart is currently empty!
The Four Exposure Scenarios
One of the taller hurdles for most underwater photographers to overcome is consistently acquiring proper exposures. One reason that so many of us struggle with exposures is that traditionally speaking we tend to talk about images in terms of the lens being used – a macro vs. a wide-angle lens- as opposed to the exposure scenario.
While the maco vs. wide-angle lens discussion has its place, I think it is usually more helpful to consider the exposure scenario. Allow me to explain.
There are four basic exposure scenarios. This means that for most sport shooters every time you take a picture underwater you will find yourself in one of these four scenarios. Each scenario requires its own understanding and techniques. The bottom line is, if you recognize which of the four scenarios applies to the shot you are taking at a given instant, and you know the technique required to acquire a proper exposure in that scenario, you have a very good chance to get your shot.
There are a few caveats as follows: You need to know how to use your camera, strobe and light meter. In conjunction with that knowledge you need to understand your light meter readouts and know how to make exposure-related adjustments according to those light meter readings. That might sound complicated, but all I am saying is that if your light meter indicates that you are going to over expose your shot, you need to know how to adjust your camera settings, strobe power settings, or strobe-to-subject distance to darken the shot. Conversely, if your light meter indicates under exposure, you need to know what to do to brighten your shot.
You also need to know how to make adjustments to brighten or darken your scene when a light meter reading is not involved in creating the shot.
Another caveat is a rather specialized scenario that involves placing strobes in various places in caves or on a shipwreck, and having those strobes set in such a way that they will fire when the shutter is tripped. An exposure scenario like that is way beyond the scope of this piece and of the vast majority of underwater photographers.
So, let’s look at the four basic exposure scenarios.
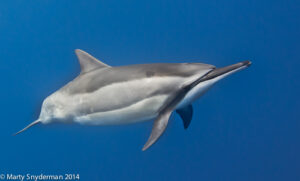
1) Exposure scenario number one is that of natural light images in which you want to reveal color and detail in your subject. Natural light alone means any lit elements in the scene are lit by the sun. No strobe light is used to light any part of the frame.
This photograph of a spinner dolphin is a good example of a natural light image in which the photographer reveals color and detail in the subject.

The technique involved:
Acquiring a proper exposure in this scenario involves taking an accurate light meter reading and setting your camera controls accordingly. I almost always use a light meter setting in my camera that allows my light meter to take a reading on the overall scene rather than on one small element.
Along with taking an accurate light meter reading, you need to compose a frame in which the main elements are well lit by the sun. And viewers need to be able to easily see those elements.
2) Exposure scenario number two is silhouettes.
This photograph of a shark is a good example of a silhouette.

The technique involved:
First, you need to see a distinct silhouette in the water. That usually means a dark subject with an interesting shape contrasted against blue water. Use a relatively fast shutter speed (1/125th of a second or faster when you can). Take a light meter reading on the blue water next to your subject with your light meter set to read only on the water you are aiming at as opposed to the overall scene.
You will not be using strobe light to expose any element in your frame. So, you can leave your strobe at home or turn it off.
With your ISO and shutter speed set, adjust your aperture according to your light meter reading, compose, focus the lens and trip the shutter.
3) Exposure scenario number three is “strobe light only”, meaning the only light source used to illuminate a scene is a strobe. Sunlight is not present.
This photograph of a Spanish shawl nudibranch is a good example of a “strobe light only” exposure. It is a macro photograph.

But before you draw any conclusions about strobe only exposures being the same as macro photographs, I want you to see that this shot of an Atlantic spotted dolphin created at night with a wide-angle lens is also a great example of an strobe light only exposure.

The technique involved:
Compose your shot so that there is no blue water or green water that is lit by the sun in your frame. This means that you can be shooting at night, in a cave, in deep or dark water, or simply pointing your lens toward the sea floor or at a subject that is in front of a wall in the background. At that point your exposure is based upon your ISO, your f/stop, the power of your strobe, and your strobe-to-subject distance.
Take a shot and look at your result. If your subject is too dark, you need to do something to add light. That usually means: (1) opening your aperture, (2) turning up your strobe power, or (3) getting closer to your subject with your strobe power set as is. Option number 4 is to increase your ISO, but getting to the ISO control takes more time and effort with many camera systems, so it is usually not the “go to” technique.
Conversely, if your subject is too bright (over exposed), you need to take some action to reduce the brightness of the light that strikes your subject. That usually means: (1) closing your aperture, (2) turning down your strobe power, or (3) backing away from your subject with your strobe. Option number 4 is to decrease your ISO, but getting to the ISO control takes more time and effort with many camera systems, so it is usually not the “go to” technique.
4) Exposure scenario number four involves matching, or balancing, the intensity of light emitted by your strobe with the intensity of sunlight that is illuminating the background of your scene. Keep in mind the fact that a strobe only impacts the exposure and color in foregrounds. Sunlight influences the exposure of backgrounds, including background water. This exposure scenario is often referred to as “balanced lighting” as the photographer is attempting to balance the intensity of two light sources, the sun and their strobe, or strobes.
Here are two examples of balanced exposures:
a) In this seascape strobe light was used to illuminate the crinoid while the sun alone illuminated the elements in the background of the shot. This shot was created with a wide-angle lens.

b) Created with a macro lens, this photograph of the face of a moray eel is also an example of a balanced exposure. The eel’s face was lit by a strobe, while the brightness of the water in the background was determined by the brightness of the light from the sun in combination with the selected f/stop, shutter speed and ISO.

The technique involved:
By far and away, the balanced exposure technique is the most complicated of the four exposure scenarios, and it requires the most thorough understanding of the tools and technique involved. In short, a thorough discussion of this technique necessitates a blog dedicated strictly to this technique. And, I assure you, it will be posted before too long.
For now, know that you are trying to balance the brightness of the light emitted by two light sources, the sun and your strobe(s). As mere humans, we have absolutely no control over the brightness of sunlight. We do control the brightness of the light emitted by our man-made strobe. This dictates that when using the balanced exposure technique you start by measuring the brightness of the sunlight that is illuminating the water in the background of a scene with your light metering system, and then you set your strobe power to match that brightness. Setting your strobe power to match the brightness of sunlight means that you have to take into account your ISO, f/stop, strobe power, and your strobe-to-subject distance.
Unless the sun goes behind the clouds, a boat passes overhead, or you suddenly find yourself in the shadow of a wall etc., your light meter reading on the water should remain constant as long as you are composing any follow-up shot in the EXACT same way.
This means that once you set your camera and lens to properly expose the background water, then you need to make the proper adjustments with your strobe power or your strobe-to-subject distance after you compose a frame that pleases you to also properly expose the foreground (strobe lit) subject.
I know that mastering the balanced exposure technique can sound like a daunting task upon first consideration. But it can be done.
In essence, trying to explain the balanced exposure technique in an article is somewhat analogous to trying to teach someone how to ride a bicycle by reading an article. New cyclists are going to skin their knees before they master the technique. And new photographers are going to miss some exposures until they, too, learn from their mistakes.
Be patient, and look for an upcoming blog dedicated to the balanced exposure technique.
I hope you enjoy and benefit from the information presented here, and we hope to see you back again 15th. If you did benefit from this blog, please tell a friend. Thank you,
Marty Snyderman For the Vivid-Pix Gang