Your cart is currently empty!
Getting Eye-Popping Color Out Of Colorful Subjects
There is no doubt that vivid colors command our attention.
Color alone won’t make a photograph exceptional. But vivid colors will draw the eyes of viewers and create interest even in ordinary subjects. And that is a message that should not be overlooked.
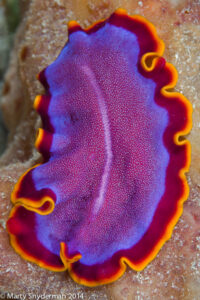
Consider the photograph of a rather colorful flatworm that illustrates this piece.

I think you will agree that the vivid colors of this otherwise relatively uninteresting worm create a “wow” factor.
Find a flatworm that looks like this one, and you have a subject with crowd-pleasing potential. But you still have to convert that potential into a pleasing image.
If you don’t, your potential crowd pleaser will look more like this.

To capture vivid colors in photographs of reef creatures that are not extremely close to the surface, you need to use a strobe. Given your f/stop and ISO, you need to be close enough to your subject for the light emitted by your strobe to “paint” colors that have been muted (or lost) as sunlight passes through water and strikes your subject. While most underwater photographers recognize this need, many of us fail to get as close as we need to. As a result, potentially colorful subjects appear bland and uninteresting.
Take a close look at the two photographs of a regal angelfish that follow: In the first image I did not get close enough to the angelfish for my strobe to have the desired impact given the camera system settings I had selected.

For the sake of comparison, let’s take a look at a photograph of a regal angelfish when I was able to properly expose my subject with light from my strobe. It’s easy to see how much more vivid the colors are, and how much more impact the photograph has.

In some instances you can easily add the “missing” colors by using the Vivid-Pix software Picture-Fix. But the truth is, you are always better off to capture the best shot you can get during your dive so that you are using post-capture software to put the finishing touches on your picture instead of as a means of trying to “save” a poorly exposed shot.
It is worthwhile to take a moment to think about what you can do in a follow-up shot when you didn’t get enough strobe light to your subject to bring out the otherwise muted colors. The fact is, there are several things you can do to bring out the desired color in a foreground subject. You can (1) increase the power of your strobe, (2) you can open your aperture to let in more light, (3) you can increase your ISO, and (4) you can get physically closer to your subject with your strobe while keeping all of the same camera system settings. As a general rule, to increase the amount of strobe light that strikes a subject most experienced photographers (1) open their aperture, (2) turn up the power of their strobe, or (3) get closer to their subject. It is not wrong to increase ISO, but in many camera systems it is more difficult to access the ISO control.
You will want to keep in mind the fact that if you open your aperture, you will decrease your depth-of-field. That trade-off is unavoidable. It is a given due to the optics of lenses.
It might surprise you that I did not list slowing your shutter speed as a way of increasing the amount of strobe light that strikes a foreground subject. The reason I did not list this possible option is because changing your shutter speed has no impact on the exposure of foreground elements lit by a strobe. None.
Here’s why: A strobe does not fire, or emit light, the entire time that the shutter is open when you take a picture. Instead, the strobe simply fires for some period of time while the shutter is open. This means that the same amount of strobe light strikes your subject no matter what shutter speed is used as long as you are not asking your strobe and camera to synchronize at a shutter speed that is faster than is possible for a given camera. Check the specifications supplied by your camera manufacturer to find the “synchronization speed” for your camera.
I hope you enjoy and benefit from the information presented here, and we hope to see you back again 15th. If you did benefit from this blog, please tell a friend.
Thank you,
Marty Snyderman For the Vivid-Pix Gang