Your cart is currently empty!
Expose For The Highlights
Hi Vivid-Pixers,
In many respects digital photography has a lot in common with analog photography, meaning the use of film. For example both digital and film cameras use f/stops, shutter speed and ISO to govern exposure. Another commonality is that at depth the use of strobe light is required to “paint in” colors back into foreground elements. If not for the use of strobe light those colors would be lost from the selective filtration of white light from the sun that occurs as sunlight passes through the water column.

And there are aspects of photography in which digital and film photography are dissimilar. The best way to expose a frame in order to see the most saturated colors and the cleanest files is a case in point. It is also the main focus of the remainder of this blog.
Back in the days when film was king, we were taught to slightly underexpose our shots in order to saturate the colors. Many top shooters took this advice to heart.

In digital photography the way to create image files that have more data and less noise is to slightly overexpose our shots,

and then bring the exposure down with post-capture software such as Vivid-Pix’s Picture-Fix.

I debated whether or not to go into a detailed explanation of why the ideal way to expose digital frames is to overexpose the shot. Ultimately, I opted to include this explanation. If it seems a bit too technical and “geeky” for your level of interest, you can skip several paragraphs down to where the first sentence reads: “This brings me back to the point of exposing for the highlights”.
For those that want to know why we should overexpose to get the cleanest frames in the digital era, here goes: You can think of digital files as consisting of two elements, (1) data and (2) “no-data”. Where there is a lack of data, we get noise in our images. Sometimes you hear people state that noise is like film grain. That’s not quite right.
Noise is what we get when a digital file tries to fill up the empty (no data) space in an image file. Noise appears as unwanted green, magenta and other colored flecks (blocks or strings of pixels) that are not present in the scene that was photographed. While grain often adds to the ambiance of a film image, noise is a potentially ruinous distraction.
Noise shows up in dark area of our images. This is because in the digital world the less light, the less data in the image file. In fact, if you halve the light, you halve the data. And where there is a lack of data digital files fill with noise.
You should be able to see a lot of noise in this picture.

That’s because this picture was grossly underexposed so there were a lot of dark areas. I increased the exposure on my computer with image manipulation software, and the noise in the foliage behind the bird was revealed.
Now consider a hypothetical digital camera that can record discernable data over a range of six f/stops. This means you can see some detail in an image in areas that are as much as three f/stops underexposed and three f/stops overexposed. Beyond three f/stops in either direction the areas will be so drastically under or overexposed that there is nothing post-capture software can do to salvage those areas because there is no data to manipulate.
With this hypothetical camera, areas in a photograph that are more than three f/stops underexposed will be solid black in your picture no matter what you do. And areas that are more than three f/stops overexposed will be pure white. And once again, there is nothing you can do with post-capture software to show ant detail in these areas because the camera’s sensor is incapable of recording any detail in areas that are so far under or overexposed.
If you think of a digital file as a bucket filled with data and no data, then the areas that are more than three stops overexposed and more than three stops underexposed are the areas of “no data”. And digital technology has a tendency to fill the “no data” area up with noise.
Now consider the fact that in digital technology, where there is little light- in dark and shadow areas of an image file- there is more “no data”, or noise.
The bottom line here is that if you underexpose an image, and you try to increase the exposure on your computer you don’t have an ideal amount of data to work with. So as you increase the exposure, essentially making your image brighter, you reveal all of the noise in the darker areas of the shot.
Some noise is present in dark and black portions of an image created by any digital camera. If you have to increase the exposure when you manipulate the image file, then your image will like reveal some unwanted noise. The less sophisticated and older the camera, the more noise that will likely be present in dark and shadow areas of an image file.
That said, a little bit of noise is not ruinous. In fact, it is likely to go unnoticed. But a lot of noise, well, that’s another matter altogether. To avoid noise and acquire image files with more data we want to avoid underexposure.
Well, what about overexposure? The fact is until you “clip your data”, or overexpose to the point that there is no data in those parts of an image file, your exposure is in the ideal range. Ultimately you will reduce the exposure with post-capture software to the point that you like the way the shot looks. At that point you will have minimal noise and a data-rich file that you can manipulate as desired.
This brings me back to the point of exposing for the highlights. Consider this frame of the whitemouth moray eel with its mouth agape.

If you expose for the overall scene you will likely grossly overexpose the bright white parts of the mouth as can be seen here. That is because so much of the frame consists of darker elements that when they are properly exposed the bright white parts get grossly overexposed. Those overexposed white parts end up being a big, even ruinous, distraction.
Now, let’s see what happens when I properly exposes the bright white parts as I did here. In this shot you can see detail in those white parts as they are not completely “blown out”.

So in this shot the white parts look good, but the dark elements in the shot are too dark. Depending upon the image manipulation software you have and how accomplished you are at using it, the goal is to increase the exposure to the point where the whites look acceptable and the darks are bright enough so that a viewer can see the important features.

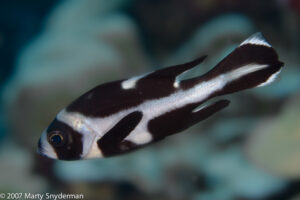
In closing, I want to point out that learning to see that there are some likely bright, white or highly reflective areas within a frame takes practice and effort. If you are a mere mortal you will probably have to work at reminding yourself to think about the bright white stripes on a fish, the mouth of a whitemouth moray, and the underbelly of a shark or manta ray.
But with a little practice exposing for the highlights will become second nature, and your skill level as an underwater photographer in the digital era will have taken a big leap forward.
We hope you enjoy and benefit from the information presented here, and we hope to see you back again in a couple of weeks. If you did benefit from this blog, please tell a friend about it.
Thank you,
Marty Snyderman For the Vivid-Pix Gang